Forms, HTTP servers, and Polymer with Dart
(Update of this old Web UI post. Updated as of Jan 17, 2014 and Dart 1.1.)
Dart can be used on the client and the server. This post shows how to:
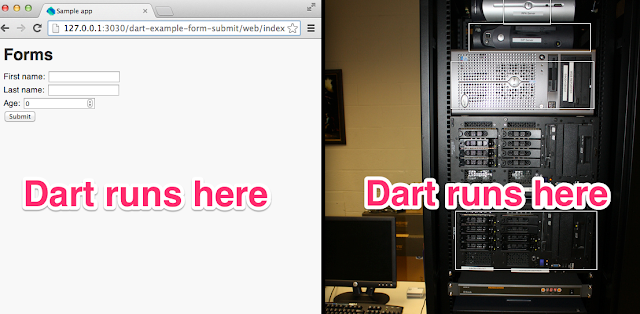
Dart can be used on the client and the server. This post shows how to:
- build a form as a custom element
- bind input fields to a Dart object
- build a Dart HTTP server
- handle and parse a form submit
For lots more Polymer.dart examples, be sure to check out the Dart Polymer Samples. You can find the code for this post at my Github account.
Step 1: Install the packages
Open up pubspec.yaml (used by the pub package manager) and add the dependencies for Polymer.dart and http_server.
name: parse_form_submit
description: A sample Polymer application
dependencies:
  polymer: any
  http_server: any
Step 2: Create the model class
This class is for the "business object". It is bound to the form, so we make its fields observable.
library models;

import 'package:polymer/polymer.dart';

class Person extends Object with Observable {
  @observable String firstName;
  @observable String lastName;
  @observable int age = 0;
}
Step 3: Create the custom element HTML
This custom element, brought to you by Polymer.dart, wraps the form and makes it easy to reuse. The <template> tag contains the structure of this custom element. The submit event runs the doSubmit() method of this custom component (see in the next step).
A Dart class, linked by the <script> tag, backs this custom element.
<!DOCTYPE html>

<polymer-element name="person-form" attributes="action">
  <template>
    <div id="message"></div>
    <form method="post" on-submit="{{doSubmit}}">
      <div>
        First name: <input type="text" value="{{person.firstName}}" name="firstName">
      </div>
      <div>
        Last name: <input type="text" value="{{person.lastName}}" name="lastName">
      </div>
      <div>
        Age: <input type="number" value="{{person.age | asInteger}}" name="age">
      </div>
      <div>
        <input type="submit">
      </div>
    </form>
  </template>
  <script type="application/dart" src="person_form.dart"></script>
</polymer-element>
Step 4: Create the custom element Dart code
If a custom element needs custom behavior, you can implement it with Dart. Each custom element tag you use on the page has an instance of its corresponding class. Here, the PersonForm class goes with the <person-form> tag.
The doSubmit() method is called when the form is submitted (see the on-submit binding from Step 3).
In this case, we disable the default behavior of form submission so we don't incur a page reload. We use HttpRequest to submit the form data, and update a div inside our custom element with the response text.
import 'package:polymer/polymer.dart';
import 'models.dart';
import 'dart:html';
import 'ui_filters.dart' show StringToInt;
import 'package:polymer_expressions/filter.dart' show Transformer;

@CustomTag('person-form')
class PersonForm extends PolymerElement {
  final Person person = new Person();

  PersonForm.created() : super.created();

  @published String action;

  doSubmit(Event e, var detail, Node target) {
    e.preventDefault();

    FormElement form = target as FormElement;
    form.action = action;

    HttpRequest.request(action,
          method: form.method,
          sendData: new FormData(form))
        .then((HttpRequest req) {
          shadowRoot.querySelector('#message').text = req.responseText;
        })
        .catchError((e) => print(e));
  }

  // Filters and transformers can be referenced as fields.
  final Transformer asInteger = new StringToInt();
}
Step 5: Import and use the custom element
Use a <link> tag to import the custom element. You must also export polymer/init.dart, which helps to initialize the app.
<!DOCTYPE html>

<html>
  <head>
    <meta charset="utf-8">
    <title>Sample app</title>
    <link rel="stylesheet" href="parse_form_submit.css">
    <link rel="import" href="person_form.html">
    <script type="application/dart">export 'package:polymer/init.dart';</script>
    <script src="packages/browser/dart.js"></script>
  </head>
  <body>
    <h1>Forms</h1>

    <person-form action="http://localhost:8888/submit"></person-form>

  </body>
</html>
Step 6: Write the server
Dart's dart:io library help you write command-line and server-side application. We use the http_server package for additional HTTP server functionality. The server listens for POST requests, parses the form data into a Map, enable CORS headers (so pages from any origin can submit to this server), and sends back a string version of the original form data.
import 'dart:io';
import 'package:http_server/http_server.dart';

echo(HttpRequest req) {
  print('received submit');
  HttpBodyHandler.processRequest(req).then((HttpBody body) {
    print(body.body.runtimeType); // Map
    req.response
      ..headers.add('Access-Control-Allow-Origin', '*')
      ..headers.add('Content-Type', 'text/plain')
      ..statusCode = 201
      ..write(body.body.toString())
      ..close();
  });
}

main() {
  HttpServer.bind('0.0.0.0', 8888).then((HttpServer server) {
    print('Server is running');
    server.listen((HttpRequest req) {
      if (req.uri.path == '/submit' && req.method == 'POST') {
        echo(req);
      }
    });
  });
}
Summary
Ta da! You've just used Dart to create a live, data-bound form and wrapped it up in a web component. Then, you wrote a Dart server to parse the form data and return a simple response. Be sure to checkout the Github repo for this post for all the code. Is this the best we can do? Probably not, you probably want a more full-featured server-side framework. There are a few in pub.dartlang.org for you to explore.
Learning more
To learn more about Dart, try these resources: